
When drywall gets damaged, whether by a doorknob that’s swung too hard or a nail or screw that pops out from lumber shrinkage, you need to take action. Minor blemishes can usually be covered with touch-up paint, but larger holes or cracks require a patch and joint compound.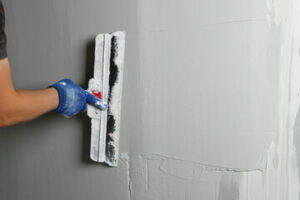
Start with Drywall Repair Las Vegas kit that includes all the tools you need to get started.
Small holes and cracks in drywall are easy for most do-it-yourselfers to repair. Cracks smaller than 1/2 inch in length are best mended by covering them with a roll of self-adhering drywall tape and a thin coat of drywall compound (also known as mud). Apply the drywall tape first, then spread a layer of mud over it. The drywall tape provides structural reinforcement for the mud and prevents the cracks from reappearing in a few months, as they might do without the added support.
Larger holes and cracks are a bit more complicated to patch, but not difficult. Start by shining a flashlight into the area to make sure that electrical cords or plumbing lines aren’t running through it. If they are, you’ll need to cut the hole larger to accommodate them and use a drywall patch kit that includes furring strips to support the replacement piece of drywall you’ll be installing.
Using a putty knife made for repairing drywall rather than the kind of narrow utility knife you would use for wood putty, apply a thin layer of mud over the damaged area, smoothing it until it is flush with the wall. Then apply another coat, letting it dry between each application. Continue until the hole or crack is no longer visible.
If the hole or crack is in a corner, it’s a good idea to use a fine-grit sanding sponge to make the corner crisp and neat. Once you’ve sanded the drywall patch smooth, wipe it clean with a damp cloth and paint it to match the existing wall.
Drywall isn’t meant to be perfect, but if you take the time to do it right, it can be an affordable and relatively simple way to spruce up your home. Don’t be afraid to experiment with a few patches until you find the process that works best for you. And remember, if you’re ever in doubt about what to do next, call your local drywall professionals for advice! They can walk you through the entire process and help you get your home looking its best.
Patching large holes or cracks
Small holes and cracks can usually be covered with a dab of lightweight spackle or drywall mud. But as the hole or crack gets bigger, it becomes more difficult to hide without repainting the entire wall. This is when a patch comes in handy.
To patch a hole, first clear away any loose debris or drywall fragments. Then measure the hole and cut a piece of scrap drywall slightly larger than the size of the hole. This piece will serve as the backing for the new patch. Apply a layer of drywall tape to the back of the drywall and to the surface of the patch. Make sure that the pieces of tape overlap each other and smooth them with your putty knife, leaving no loose or raised edges.
Once the tape is in place, apply another layer of drywall mud over the patch and the tape. Smooth the mud with your putty knife, again making sure that you do not raise or leave any edges. Finally, use your knife to feather the edge of the patch so that it blends into the rest of the wall.
If you are fixing a large hole in the drywall or want to prevent future cracks, consider adding reinforcement mesh before applying a patch. This is available from most home improvement centers and will help to strengthen the drywall, reduce shifting, and prevent further cracking.
There are also pre-cut patches available online or at most hardware stores that look like screens and simply stick to the wall over the hole. These are usually recommended for holes less than four inches wide.
If you are dealing with a much larger hole, use your stud finder to locate the studs on either side of the damaged area. If the damage extends to the studs, a patch will be enough; if it is a gap, then you will need to bridge the gap with a strip of fiberglass mesh. This can be purchased from most home improvement centers and is often included in a repair kit for large gaps in drywall.
Sanding and smoothing the surface
Many drywall repair jobs involve sanding and smoothing the surface. It’s important to do a good job of this step, as it will help the finished paint job look great.
Sanding creates a lot of dust, so it’s important to wear a mask when working. You can also use an electric sander with a vacuum attachment to reduce the amount of dust created. It’s a good idea to have a broom handy to sweep up any debris as it accumulates.
Drywall sanding is a messy process, and it takes a while to complete. For this reason, it’s a good idea to have sandpaper and other supplies close at hand so you can take your time and do a thorough job.
When sanding drywall, it’s a good idea to start at the top of the wall and work your way down. This will prevent any damage to the underlying surface or any loose bits of paper tape that may be sticking out.
After the first coat of sanding has dried, you can apply a second and third to further refine and smooth the surface. This will make the repaired area blend in with the surrounding drywall and allow you to refinish the wall.
For the final sanding, you can use a hand sander or an electric sander with fine-grit sandpaper. A fine grit will prevent damage to the surface and leave it ready for primer and paint.
If you’re using a power sander, you can also use a sanding sponge attached to the sanding drum. This will save you some time and effort because you won’t have to worry about changing sandpaper as often.
When you’re sanding, be sure to follow the manufacturer’s instructions for your tool. This will ensure that you get the best results from it and avoid any damage or problems.
While it may seem like a hassle to perform drywall repair, it’s actually quite simple. With a little bit of patience, you can fix any holes or cracks in your walls and get them ready for painting. Instead of hiding these blemishes with furniture or other decor, you can paint them to make them virtually invisible.
Primer and paint
When a homeowner or painting contractor paints a wall, the goal is for the paint to look smooth and adhere for a long time. This is why it’s important that the surface of the drywall be properly primed and prepared for paint. If the drywall is not primed, the topcoats of paint may show through or peel later on, leading to costly and frustrating repairs.
Priming drywall ensures that the paint will stick well to the surface and also helps the topcoats of paint look uniform in color. This is particularly important with textured drywall, as the texture can cause paint to droop or flake.
There are many different kinds of primers, but the key is to find one that’s made for drywall and has a high binder content. The more binder in a primer, the better it will hold up to topcoats of paint.
When applied, a good primer will seal all of the pores in the drywall mudding and wall paper, making them less likely to absorb excess moisture from the environment. Primers also make the drywall surface more receptive to new paint. Because a layer of primer is so thick, you don’t need to apply as much paint to the walls, allowing for faster painting and a more cost-effective job.
In addition to sealing and preparing the surface, a good primer can help conceal any small cracks or dings in the wall. However, it’s important to remember that a primer is not a replacement for a paint coat. Minor blemishes should still be touched up with touch-up paint or by repainting the entire surface of the wall.
Before starting the paint job, the drywall should be completely dry, which can be achieved by running a fan in the room. This will help prevent mold and mildew from growing in the area, and it will also reduce the amount of dust that accumulates on the walls during the paint process. It’s important to keep in mind that painting a brand new piece of drywall requires several coats of paint, so it is best to consult with a painting expert for advice on the proper technique and colors for your project.