post

Bathroom Painting – Choosing the Right Paint

Painting your bathroom is a satisfying and relatively easy home improvement project. You just need to take a few extra steps to ensure a smooth and successful outcome.

Moisture is the enemy of paint, especially in bathrooms. Steam from showers and water splashes from sinks or tubs can cause mold to form, which can damage and stain your paint. Read https://bunburypaintingservice.com.au/ to learn more.

painting service

If you want a bathroom that looks fresh and clean, the right paint is essential. Since this space is constantly exposed to moisture, it’s important to choose a mildew-resistant formula. You should also opt for a washable paint, as this will be easier to keep clean and free of mold. If possible, look for a paint that has antimicrobial additives to further reduce the risk of mould growth.

Choosing the correct paint style is also key. In years gone by, it was common for interior painters to use semi-gloss paint in bathrooms, as this type of finish was considered more moisture resistant and could be cleaned more easily than flat/matte or eggshell paint. Nowadays, there are many different types of paint with various sheen levels that will perform well in a bathroom, so you can decide what is best for your space.

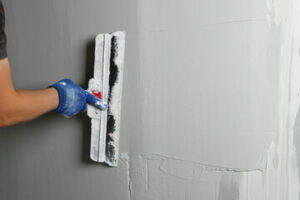
In addition to choosing the right paint, it’s essential to ensure your bathroom is properly prepped before starting your painting project. Thorough cleaning and priming of walls will seal porous surfaces and create a smooth surface for your primer and paint. You should also make sure your bathroom is well-ventilated to keep condensation and fungus at bay. Finally, don’t skip the step of putting up an exhaust fan – this is one of the most effective ways to minimize the likelihood of mildew and other spores growing on your bathroom walls.

A good primer will not only help your new paint adhere to the surface, but it can also hide any evidence of water damage, cover cooking, smoking or candle stains and even conceal minor wall flaking. Make sure to follow the manufacturer’s directions and allow the primer to dry completely before beginning your actual paint job.

The rest of the supplies you’ll need for this task are fairly simple: a roller, tray, angled paintbrush, painters tape, sandpaper, a flat-head screwdriver to remove electrical plates, a tarp for the floor and your chosen paint. If you’re unsure about what color to choose, ask your local paint store for recommendations or pick up samples from a home improvement store to see how the colors look in the space at different times of day.

A bathroom is a wet room, and moisture is one of the biggest issues when painting these rooms. If the paint isn’t designed to handle the moisture then it will start peeling and chipping over time, and this is especially true for wall color. So it is important that you choose a paint with mildew-resistant properties to help protect the surface of your walls.

It is also important to prepare the walls before you start painting, as this will ensure that the new paint adheres properly and looks great. So start by washing the walls using a sponge dipped in a solution of one part bleach to three parts water. Make sure the room is well-ventilated while you are cleaning and be sure to scrub any existing mildew spots. After washing, allow the walls to dry completely before you begin painting.

Next, lightly scuff the walls with a fine grit sandpaper to dull any existing paint and to ensure that any new coat of paint will stick to the surface. If you do this before priming then it will save you a lot of time and work later on. Finally, be sure to remove anything that you can from the walls (like draperies and pictures), and cover up any surfaces that you can’t get rid of (like outlets and switch plates). Masking these areas will prevent you from accidentally rolling paint on them when you are finished.

When you are ready to paint, be sure that you have all of your tools and supplies nearby so that you can quickly get started. It is a good idea to put down a tarp or drop cloth in the room to protect any items that you can’t move, and to use painters tape to mask off any areas that you will not be painting, like doors, windows, and base trim.

Be sure to use a stain-blocking primer before painting in the bathroom, as this will help to ensure that your new paint won’t bleed into any existing marker or crayon marks. Marker and crayon marks can bleed through even several coats of regular primer and paint, so it is important to wash them off before applying any new coatings. If the marks still bleed through, you may need to apply some spackling or joint compound and re-tape the corner bead before re-priming and repainting.

Paint is one of the easiest and most cost-effective ways to give a room a new look. It is also a great way to add some color and flair to a space, as well as send a message to potential buyers that the home was lovingly cared for and maintained. When it comes to bathroom painting, choosing the right paint is a crucial step to ensure lasting quality and prevent water damage. There are many different paint and coatings on the market, and each has its own benefits and drawbacks. Most pros recommend using a semi-gloss or high-gloss finish, which is designed to be easy to clean and resist mold and mildew.

Before you begin, make sure to prepare the space by cleaning it thoroughly. This will help the new paint adhere properly, and it will also ensure that any existing mildew is removed before it can bleed through the new coat. It is best to use a sponge dipped in a solution of water and bleach, and it is important to make sure that the room is well-ventilated while you are cleaning (open a window or turn on the exhaust fan).

Once the walls are cleaned, you are ready to begin the actual paint job. Start by cutting in with a brush around the edges of the wall, and then switch to a roller for the rest. Be sure to stir the paint before pouring it into a tray or dipping your brush in, as this will help to evenly distribute the pigments.

If you are painting over a light color, consider using a primer to help the color go on smoothly and to help reduce any mildew issues that may arise. You can find a variety of primers available from most home improvement stores, and it is usually recommended to apply a coat of primer before you begin the painting process.

Once the first coat is dry, evaluate whether you will need a second coat. Depending on the color and the condition of the previous paint, you may only need a single coat. However, if you are going from a dark to a light color, or vice versa, it is typically recommended to do two coats.

A fresh coat of paint on the walls can do wonders to brighten a room, and while painting a bedroom or living room is a fairly familiar task for most do-it-yourselfers, painting a bathroom requires special care. Due to the constant exposure to moisture and mildew, it’s essential to take all the necessary steps to protect your new paint job.

First, make sure to thoroughly clean the walls before you start painting. Remove any loose wallpaper and patch any holes or cracks. After that, cover anything you can’t remove with a drop cloth or sheet, and then start prepping the surfaces for painting. If you’re going to paint over existing wallpaper, make sure to use a wallpaper paste that is water-resistant. You’ll also want to remove any fixtures, like light fixtures and mirrors, from the walls.

Once you’ve prepped the space and painted, you’ll want to add a finishing touch. Consider adding a layer of clear or semi-gloss wax to your paint to help seal the surface and make it easier to wipe down. This will keep your bathroom looking great for longer, and it’s a perfect solution for high-moisture areas.

It’s also important to choose a waterproof paint. Raleigh house painters can recommend products that are made to resist mold, mildew and other moisture issues. This type of paint typically costs more than standard interior paint, but it can save you money and headaches in the long run.


post

Drywall Repair Tips for Homeowners and Contractors

When drywall gets damaged, whether by a doorknob that’s swung too hard or a nail or screw that pops out from lumber shrinkage, you need to take action. Minor blemishes can usually be covered with touch-up paint, but larger holes or cracks require a patch and joint compound.Drywall Repair

Start with Drywall Repair Las Vegas kit that includes all the tools you need to get started.

Small holes and cracks in drywall are easy for most do-it-yourselfers to repair. Cracks smaller than 1/2 inch in length are best mended by covering them with a roll of self-adhering drywall tape and a thin coat of drywall compound (also known as mud). Apply the drywall tape first, then spread a layer of mud over it. The drywall tape provides structural reinforcement for the mud and prevents the cracks from reappearing in a few months, as they might do without the added support.

Larger holes and cracks are a bit more complicated to patch, but not difficult. Start by shining a flashlight into the area to make sure that electrical cords or plumbing lines aren’t running through it. If they are, you’ll need to cut the hole larger to accommodate them and use a drywall patch kit that includes furring strips to support the replacement piece of drywall you’ll be installing.

Using a putty knife made for repairing drywall rather than the kind of narrow utility knife you would use for wood putty, apply a thin layer of mud over the damaged area, smoothing it until it is flush with the wall. Then apply another coat, letting it dry between each application. Continue until the hole or crack is no longer visible.

If the hole or crack is in a corner, it’s a good idea to use a fine-grit sanding sponge to make the corner crisp and neat. Once you’ve sanded the drywall patch smooth, wipe it clean with a damp cloth and paint it to match the existing wall.

Drywall isn’t meant to be perfect, but if you take the time to do it right, it can be an affordable and relatively simple way to spruce up your home. Don’t be afraid to experiment with a few patches until you find the process that works best for you. And remember, if you’re ever in doubt about what to do next, call your local drywall professionals for advice! They can walk you through the entire process and help you get your home looking its best.

Patching large holes or cracks

Small holes and cracks can usually be covered with a dab of lightweight spackle or drywall mud. But as the hole or crack gets bigger, it becomes more difficult to hide without repainting the entire wall. This is when a patch comes in handy.

To patch a hole, first clear away any loose debris or drywall fragments. Then measure the hole and cut a piece of scrap drywall slightly larger than the size of the hole. This piece will serve as the backing for the new patch. Apply a layer of drywall tape to the back of the drywall and to the surface of the patch. Make sure that the pieces of tape overlap each other and smooth them with your putty knife, leaving no loose or raised edges.

Once the tape is in place, apply another layer of drywall mud over the patch and the tape. Smooth the mud with your putty knife, again making sure that you do not raise or leave any edges. Finally, use your knife to feather the edge of the patch so that it blends into the rest of the wall.

If you are fixing a large hole in the drywall or want to prevent future cracks, consider adding reinforcement mesh before applying a patch. This is available from most home improvement centers and will help to strengthen the drywall, reduce shifting, and prevent further cracking.

There are also pre-cut patches available online or at most hardware stores that look like screens and simply stick to the wall over the hole. These are usually recommended for holes less than four inches wide.

If you are dealing with a much larger hole, use your stud finder to locate the studs on either side of the damaged area. If the damage extends to the studs, a patch will be enough; if it is a gap, then you will need to bridge the gap with a strip of fiberglass mesh. This can be purchased from most home improvement centers and is often included in a repair kit for large gaps in drywall.

Sanding and smoothing the surface

Many drywall repair jobs involve sanding and smoothing the surface. It’s important to do a good job of this step, as it will help the finished paint job look great.

Sanding creates a lot of dust, so it’s important to wear a mask when working. You can also use an electric sander with a vacuum attachment to reduce the amount of dust created. It’s a good idea to have a broom handy to sweep up any debris as it accumulates.

Drywall sanding is a messy process, and it takes a while to complete. For this reason, it’s a good idea to have sandpaper and other supplies close at hand so you can take your time and do a thorough job.

When sanding drywall, it’s a good idea to start at the top of the wall and work your way down. This will prevent any damage to the underlying surface or any loose bits of paper tape that may be sticking out.

After the first coat of sanding has dried, you can apply a second and third to further refine and smooth the surface. This will make the repaired area blend in with the surrounding drywall and allow you to refinish the wall.

For the final sanding, you can use a hand sander or an electric sander with fine-grit sandpaper. A fine grit will prevent damage to the surface and leave it ready for primer and paint.

If you’re using a power sander, you can also use a sanding sponge attached to the sanding drum. This will save you some time and effort because you won’t have to worry about changing sandpaper as often.

When you’re sanding, be sure to follow the manufacturer’s instructions for your tool. This will ensure that you get the best results from it and avoid any damage or problems.

While it may seem like a hassle to perform drywall repair, it’s actually quite simple. With a little bit of patience, you can fix any holes or cracks in your walls and get them ready for painting. Instead of hiding these blemishes with furniture or other decor, you can paint them to make them virtually invisible.

Primer and paint

When a homeowner or painting contractor paints a wall, the goal is for the paint to look smooth and adhere for a long time. This is why it’s important that the surface of the drywall be properly primed and prepared for paint. If the drywall is not primed, the topcoats of paint may show through or peel later on, leading to costly and frustrating repairs.

Priming drywall ensures that the paint will stick well to the surface and also helps the topcoats of paint look uniform in color. This is particularly important with textured drywall, as the texture can cause paint to droop or flake.

There are many different kinds of primers, but the key is to find one that’s made for drywall and has a high binder content. The more binder in a primer, the better it will hold up to topcoats of paint.

When applied, a good primer will seal all of the pores in the drywall mudding and wall paper, making them less likely to absorb excess moisture from the environment. Primers also make the drywall surface more receptive to new paint. Because a layer of primer is so thick, you don’t need to apply as much paint to the walls, allowing for faster painting and a more cost-effective job.

In addition to sealing and preparing the surface, a good primer can help conceal any small cracks or dings in the wall. However, it’s important to remember that a primer is not a replacement for a paint coat. Minor blemishes should still be touched up with touch-up paint or by repainting the entire surface of the wall.

Before starting the paint job, the drywall should be completely dry, which can be achieved by running a fan in the room. This will help prevent mold and mildew from growing in the area, and it will also reduce the amount of dust that accumulates on the walls during the paint process. It’s important to keep in mind that painting a brand new piece of drywall requires several coats of paint, so it is best to consult with a painting expert for advice on the proper technique and colors for your project.